Bed Board Key Actions
Last updated: June 11, 2026
The Bed Board is an integrated exacare ai feature that provides visibility into bed occupancy and census reporting. By replacing manual spreadsheets and physical whiteboards, this intuitive tool allows you to centralize the management of beds, admissions, and discharges.
Please refer to the training video below for a tutorial of the different Bed Board Actions:
Please refer to the training video below for a detailed hospitalized to readmission and leave of absence (LOA) tutorial.
Action 1: Moving a Resident Out of Bed Board
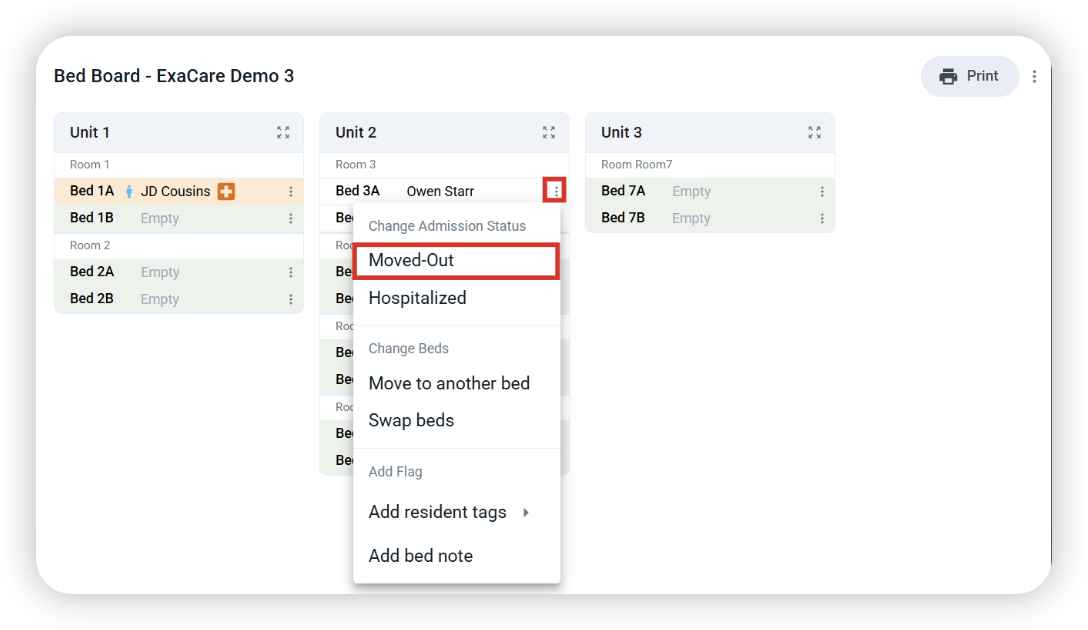
Select the three dots, and select Moved-Out:
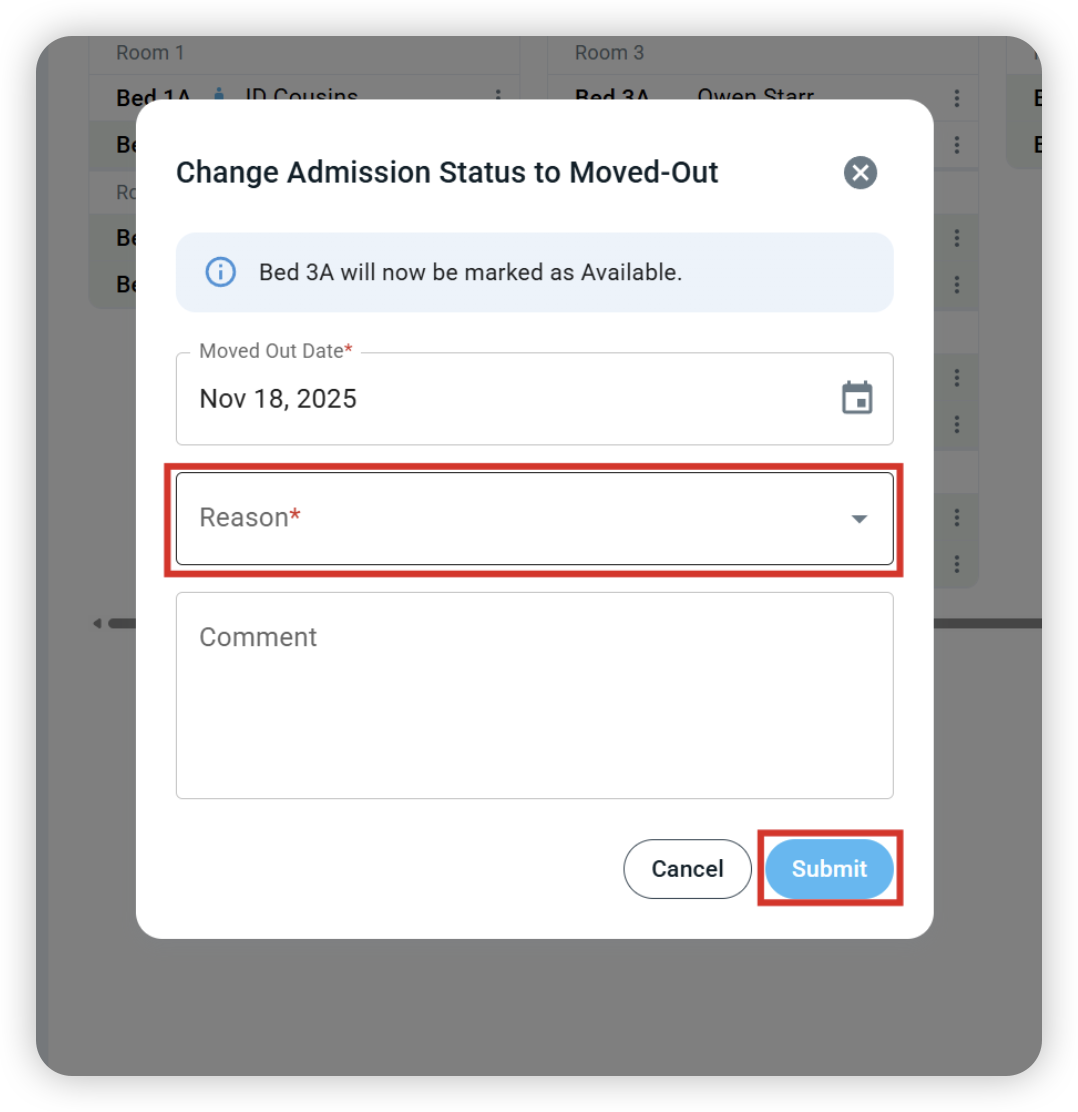
Select a Move-Out Date and a reason from the drop-down menu:
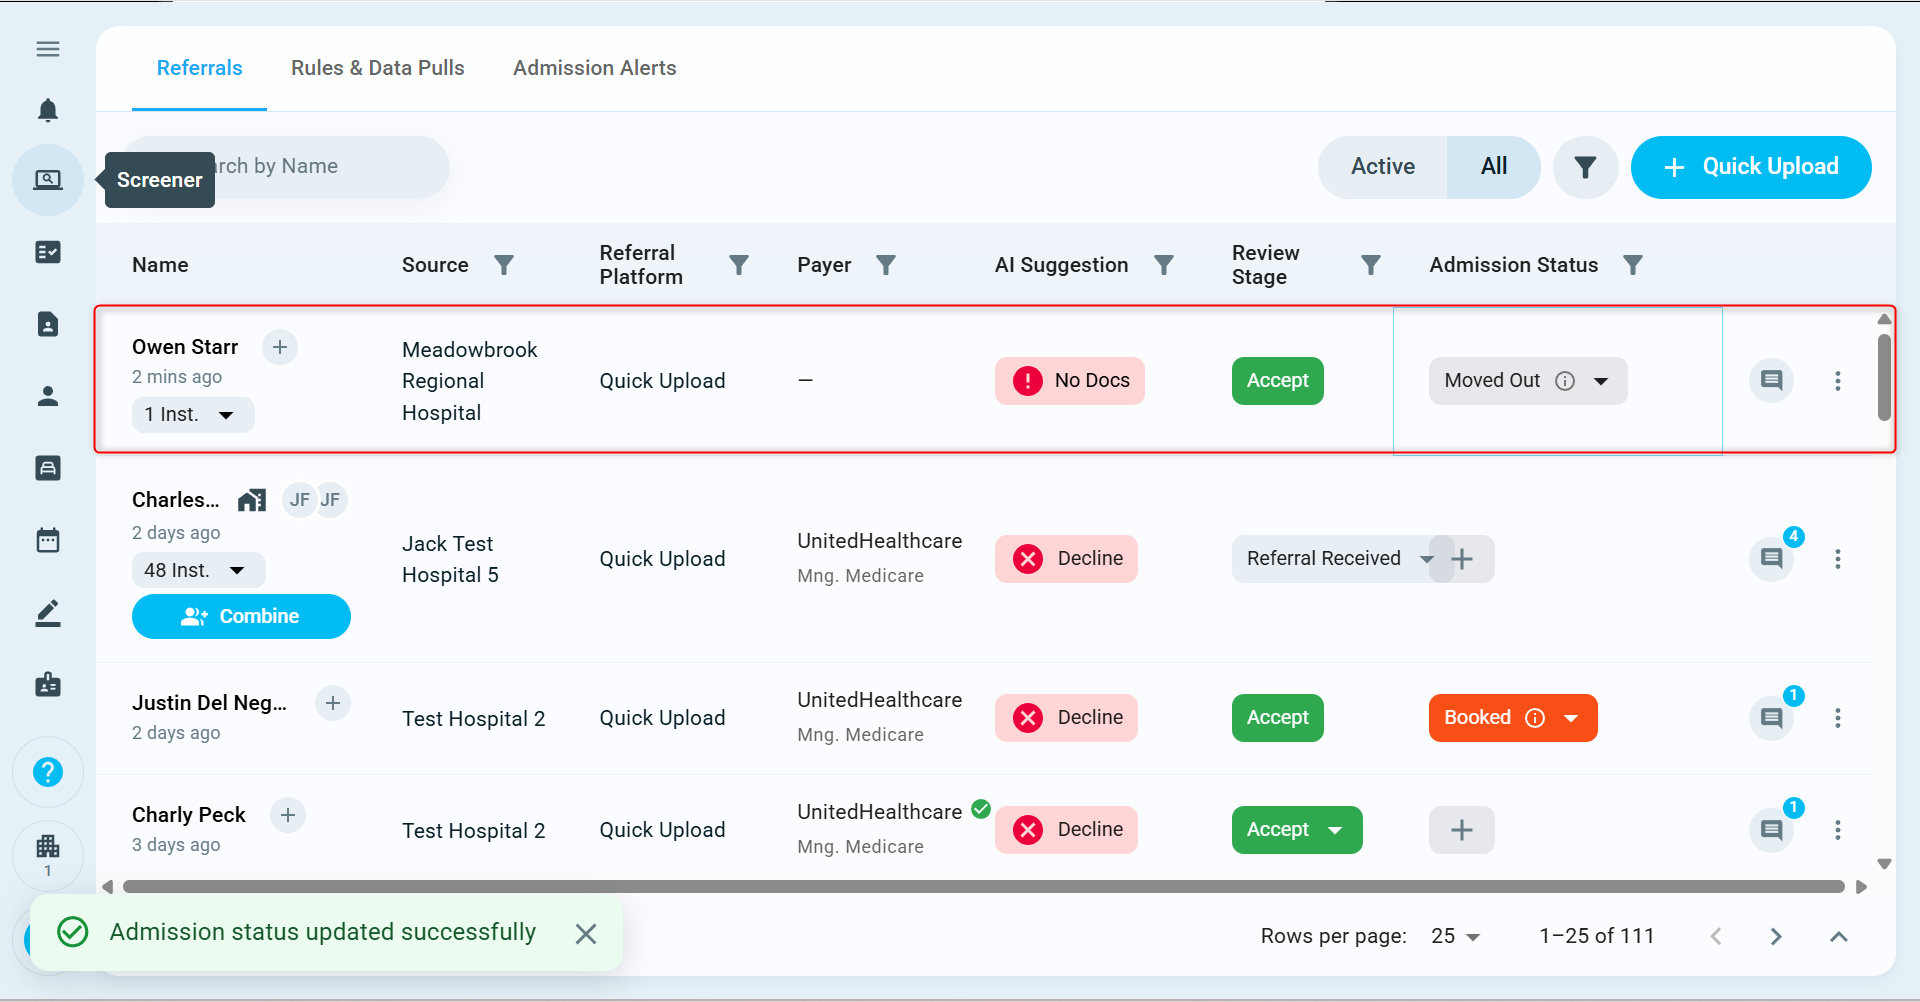
The resident will now be moved out of the Bed Board but will remain in your Residents tab with the Moved-Out status:
Action 2: Assigning the Hospitalized Status in Bed Board
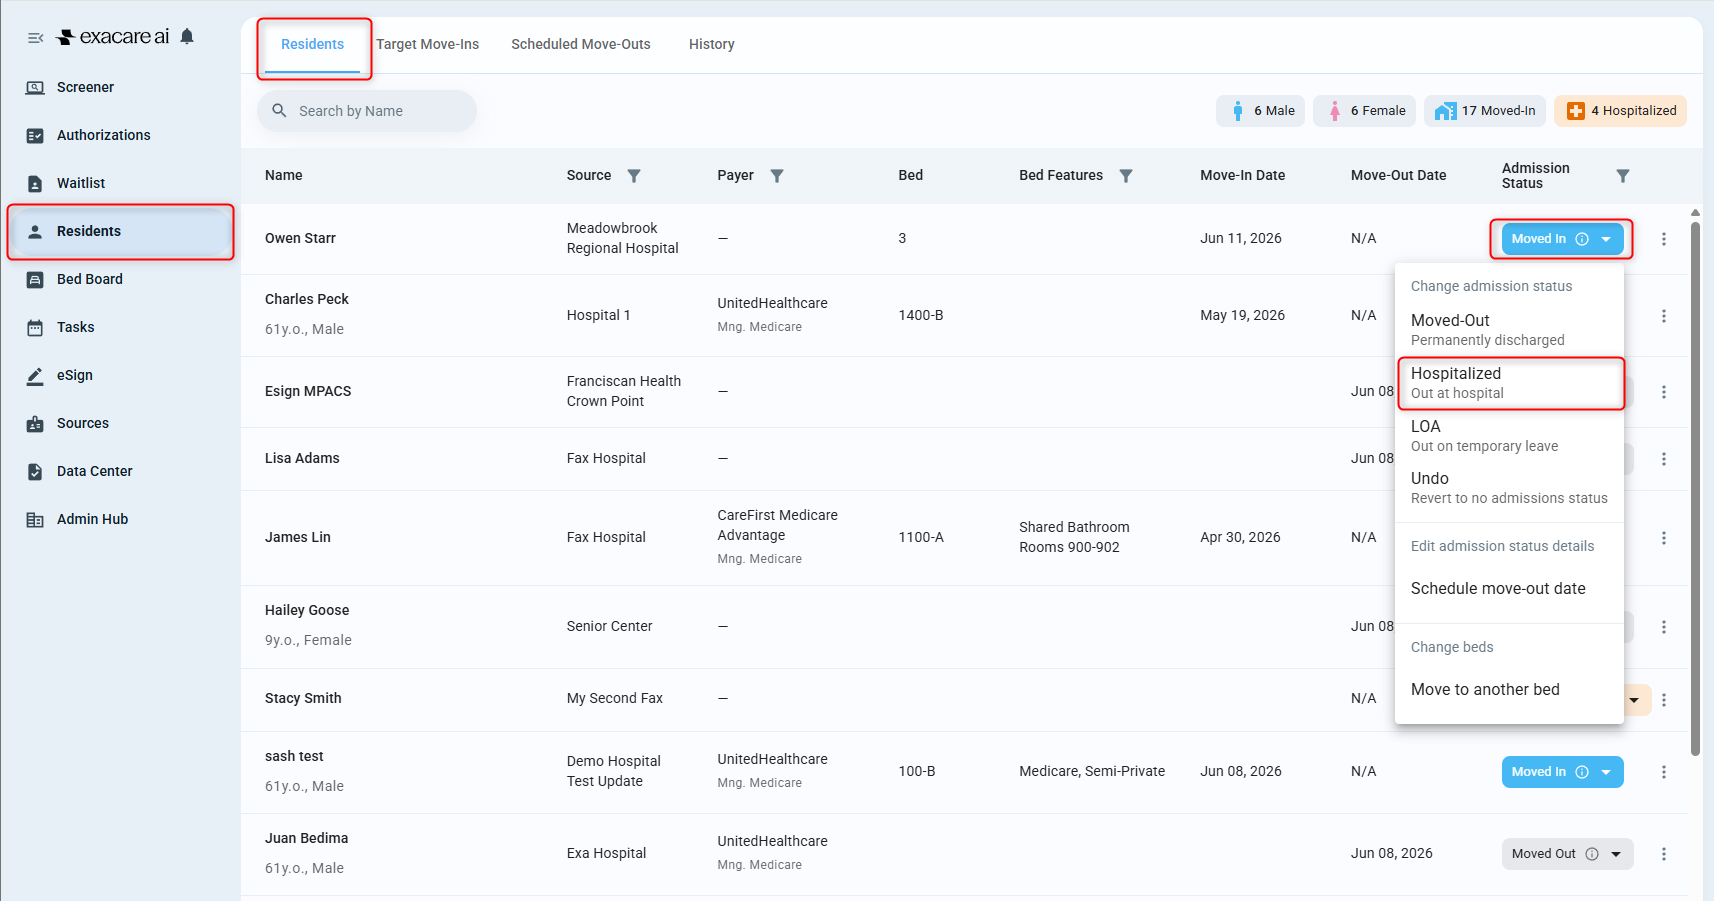
Select the three dots, and select Hospitalized:
There will be an option to hold the bed for the resident. The bed hold will start from today by default, and the end date will be optional. If an end date is selected, the bed hold will end at 11:59 PM on that date:
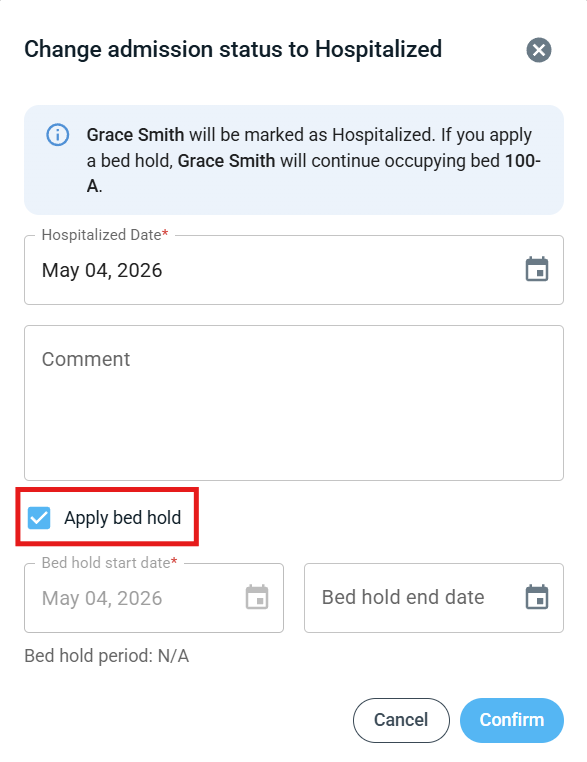
We will now see the Hospitalized icon next to the name, indicating that this resident has been admitted to the hospital. If there is a bed hold, the bed hold information will also be displayed:

The resident will also remain in the Residents tab with the Hospitalized status:

Action 3: Readmitting a Hospitalized Resident
Scenario 1: Hospital sends a new referral
If the hospital sends a new referral admissions package with the same first name, last name, and DOB, and the existing referral is currently marked as hospitalized, a Readmit to Facility option will be available for the new referral once it is accepted and the existing Hospitalized referral.
Note: This option will update the existing referral to Moved-out and the new referral to Moved-in. Since Moved-in indicates the resident has physically returned to the facility, this step should only be performed after their arrival.
A pop-up will appear to move out the existing referral.
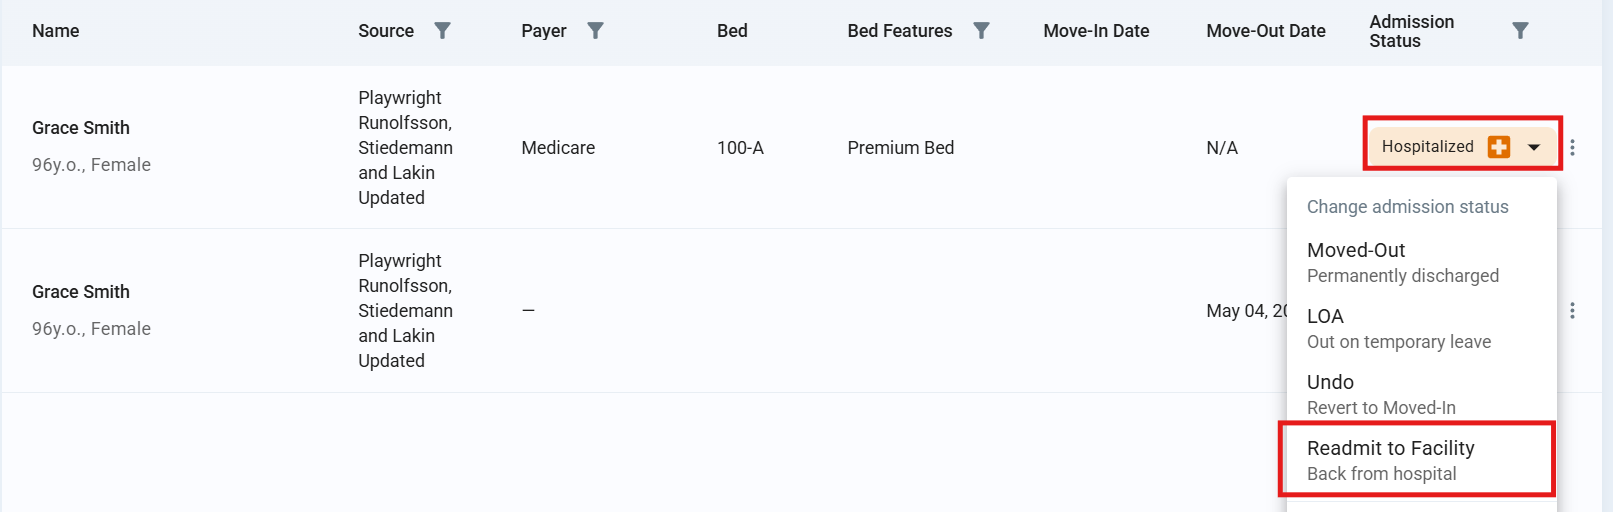
Note: The move-out date reflects when the resident’s first stay formally ended (i.e., the re-hospitalization ends and they returned back to the facility).

Confirm the move-in date and bed assignment for the readmitted resident in the next screen:
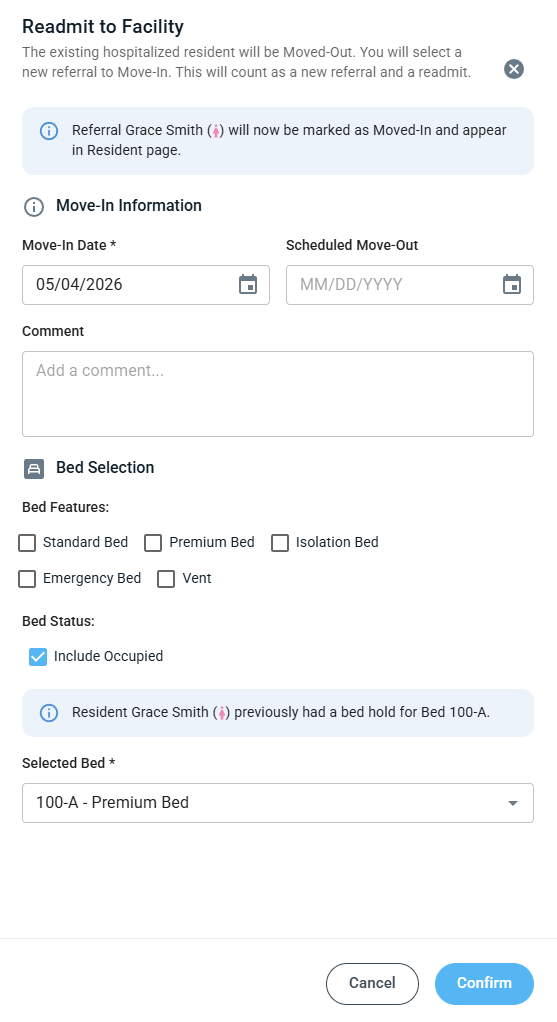
The new referral’s admission status is updated to Moved-in, while the existing referral is updated to Moved-out:

Scenario 2: Hospital does not send a new referral
If the hospital does not send a new referral, a Readmit to Facility option will be available for the Hospitalized resident
The readmission requires an accepted new referral with a matching name and DOB. This is required to ensure the data accurately captures this as a new referral. If there is no matching referral, a pop-up will be shown with two options:
(1) Exit and update so there is a matching accepted new referral available by either
Updating an existing referral’s name, DOB, and/or review stage or,
Requesting a new referral be sent from the hospital
(2) Copy the previous referral's information to create a new referral
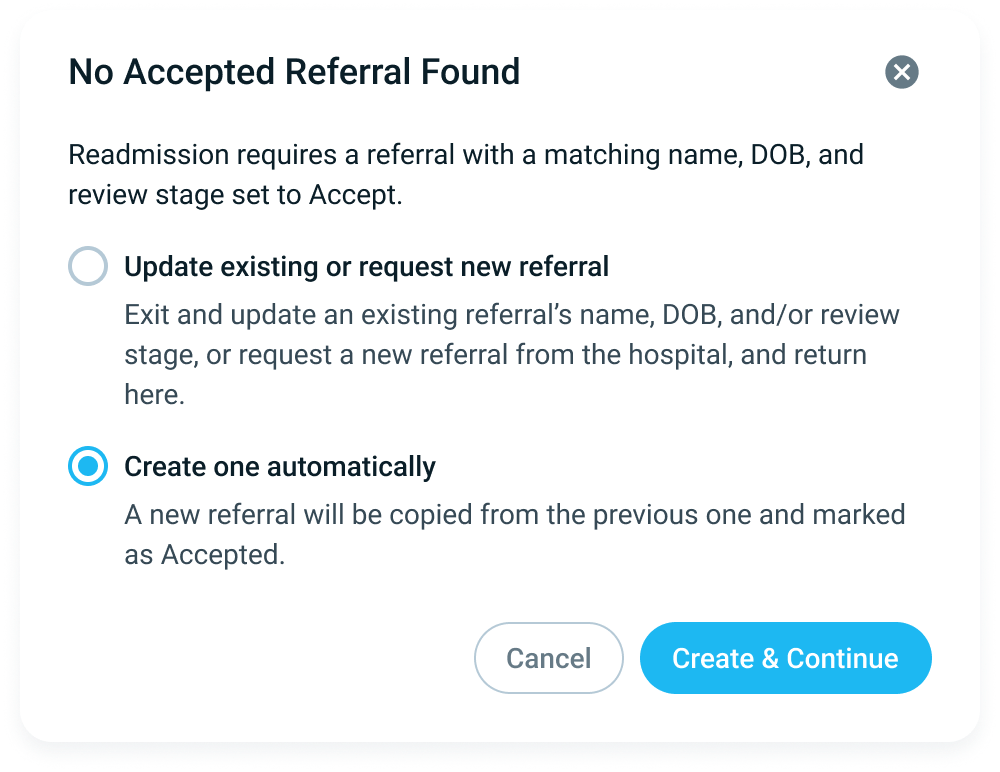
After a matching referral is found, continue the flow to select the new referral and confirm the move-out date for the existing referral. The move-out date reflects when the resident’s first stay formally ended ( i.e., the re-hospitalization ends and they returned back to the facility):
Confirm the move-in date and bed assignment for the readmitted resident in the next screen:
The new referral’s admission status is updated to Moved-in, while the existing referral is updated to Moved-out:
Action 4: Assigning LOA Status to a Resident
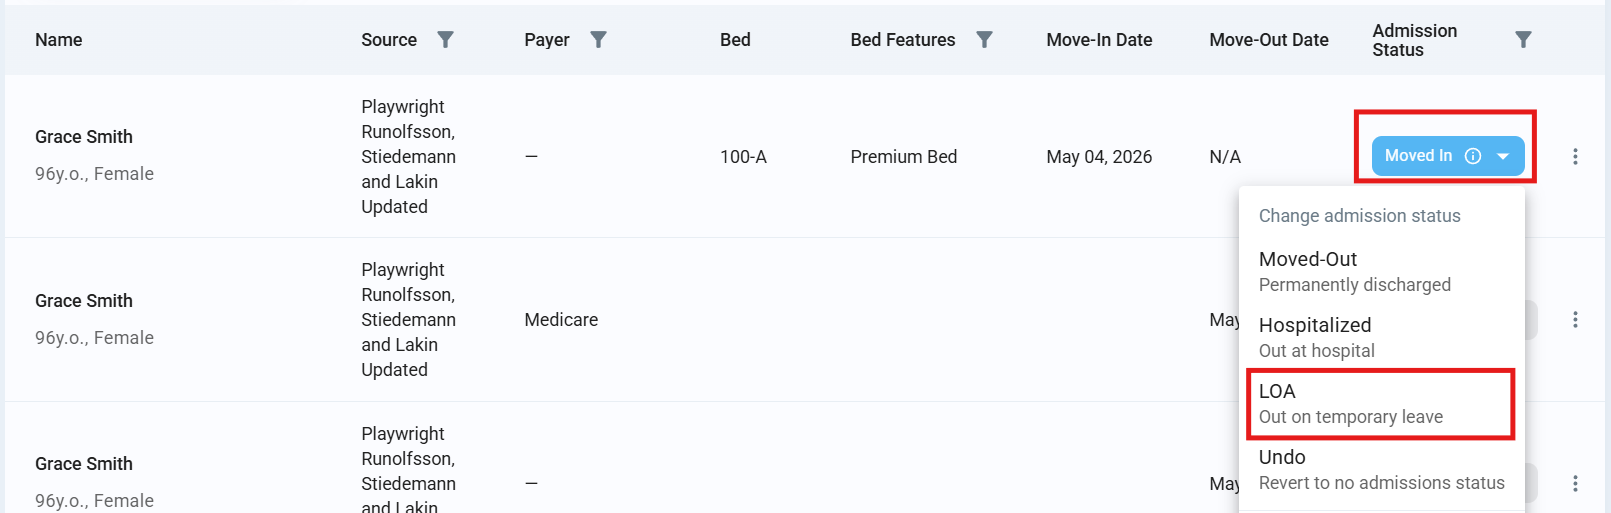
Select the moved-in icon, and choose LOA:
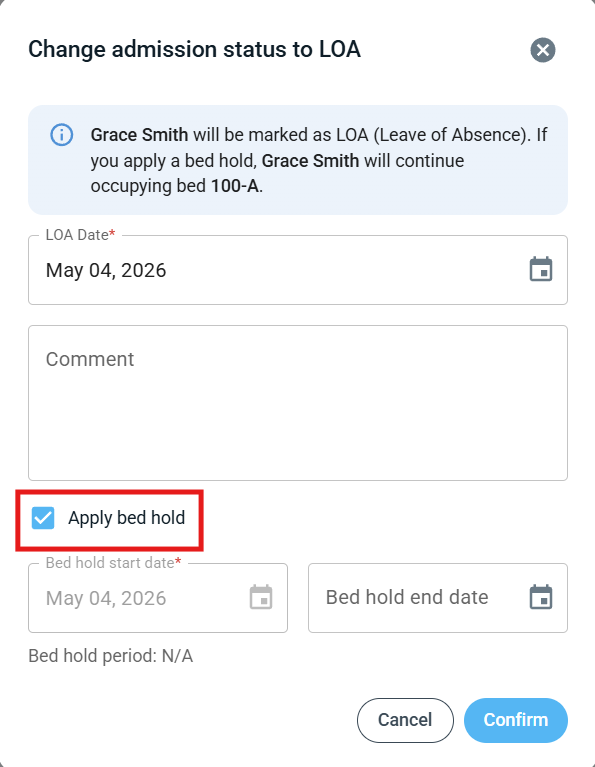
When applying LOA, there will be an option to hold the bed for the resident. The bed hold will start from today by default, and the end date will be optional. If an end date is selected, the bed hold will end at 11:59 PM on that date:
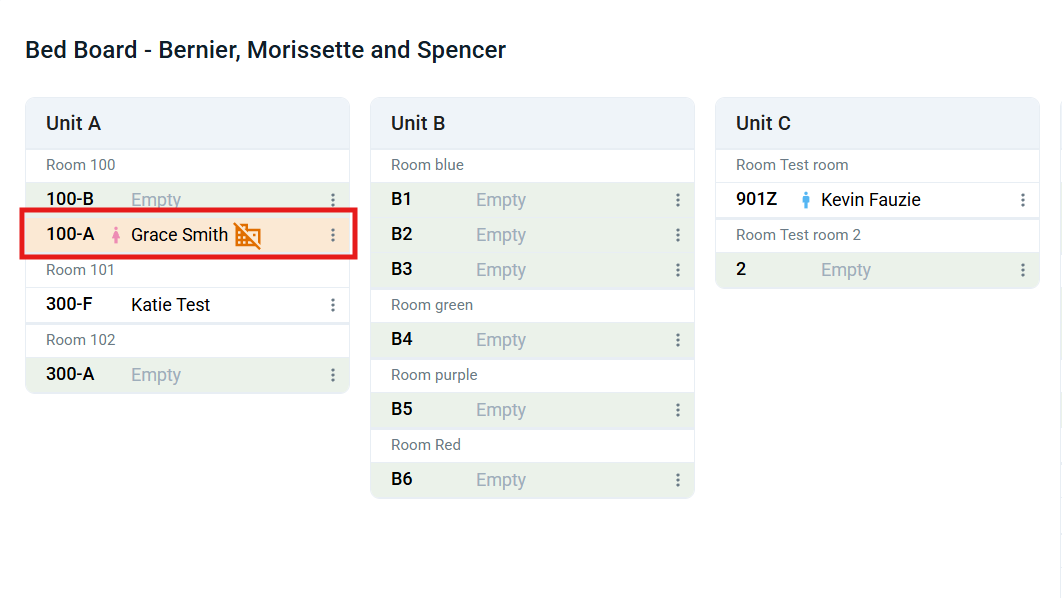
The LOA icon will appear next to the resident’s name in Bed Board, indicating that the resident is on LOA. If there is a bed hold, the bed hold information will also be displayed:
Action 5: Returning a Resident from LOA
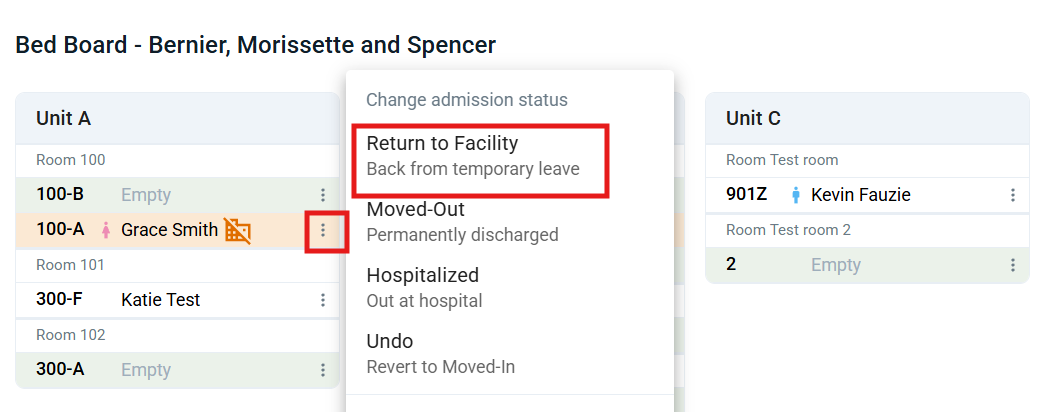
Select the three dots for the resident currently in LOA status, then select Return to Facility:
Confirm the move-in date and bed assignment in the pop-up screen:
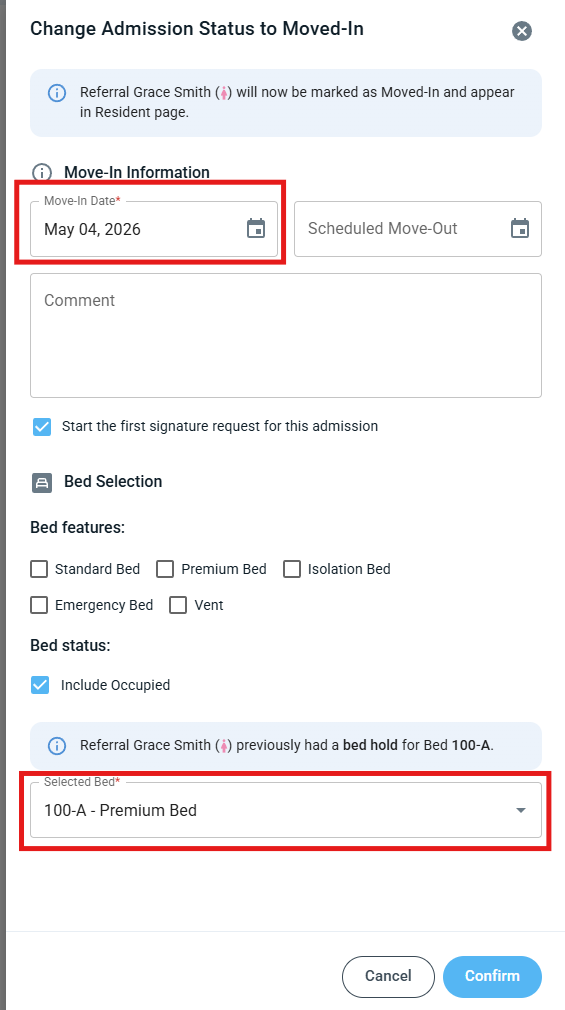
The resident will be moved back to the Bed Board:
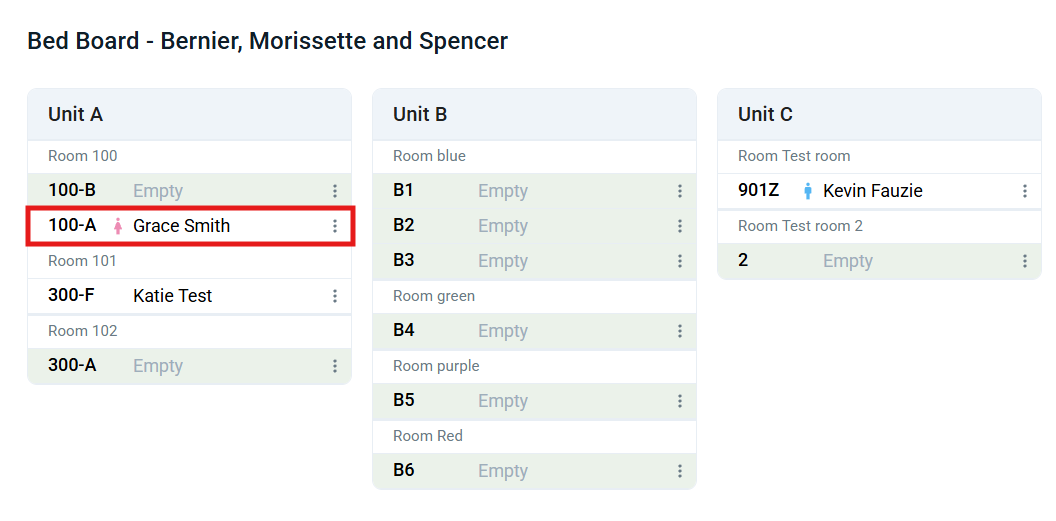
Action 6: Updating Bed Hold
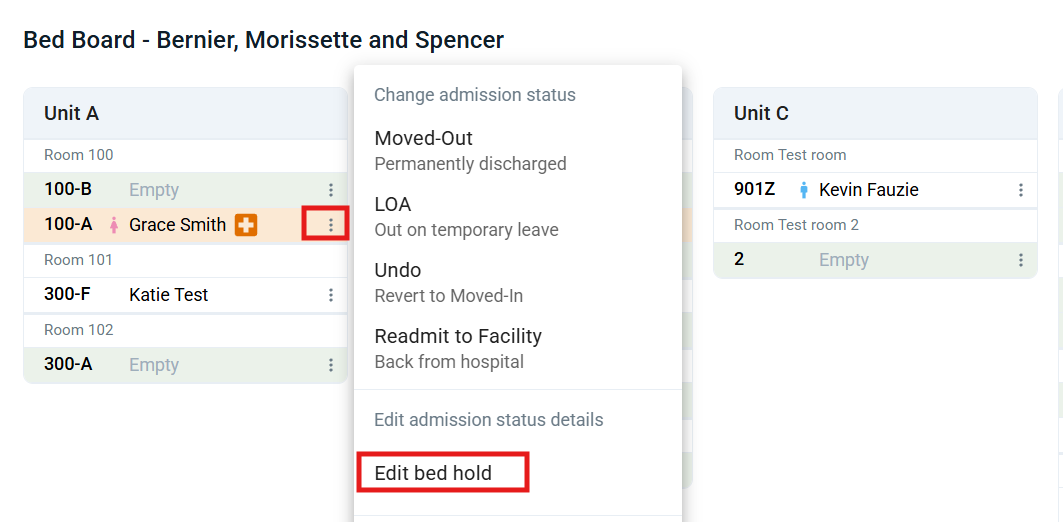
Select the three dots next to the bed in bed hold, and select Edit bed hold
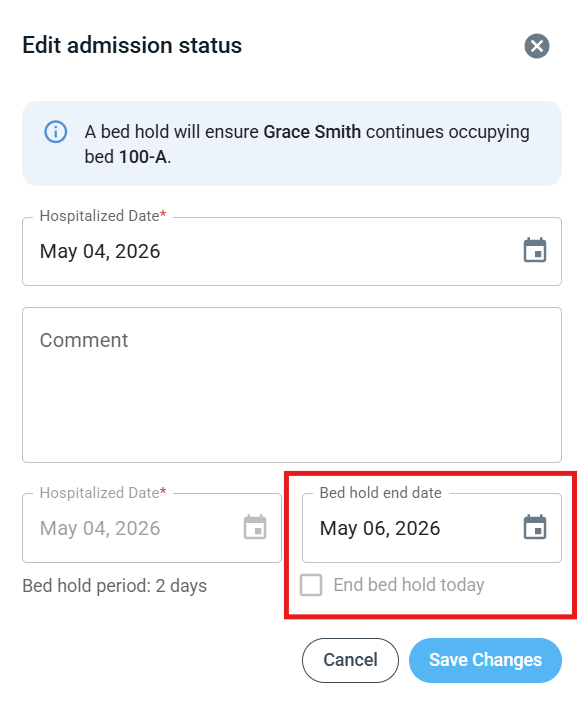
A pop-up will appear where the bed hold end date can be edited. If End bed hold today is selected, the end date will be set to today. The bed hold will end at 11:59 PM on the selected date. A bed hold cannot start and end on the same day.
Action 7: Moving a Resident to Another Bed in Bed Board
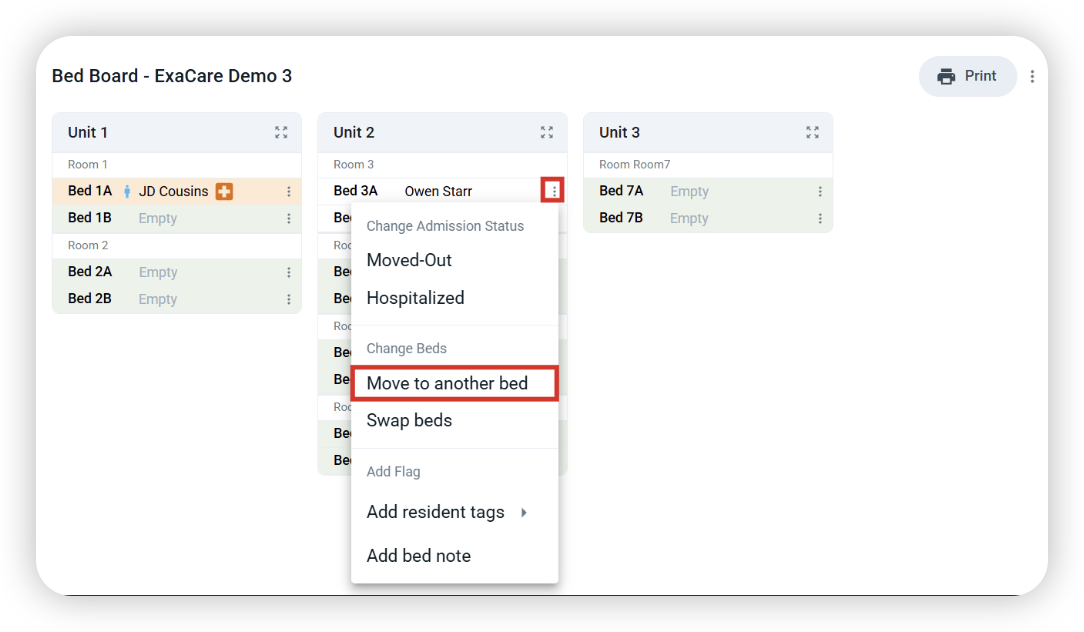
Select the three dots, and select Move to another bed:
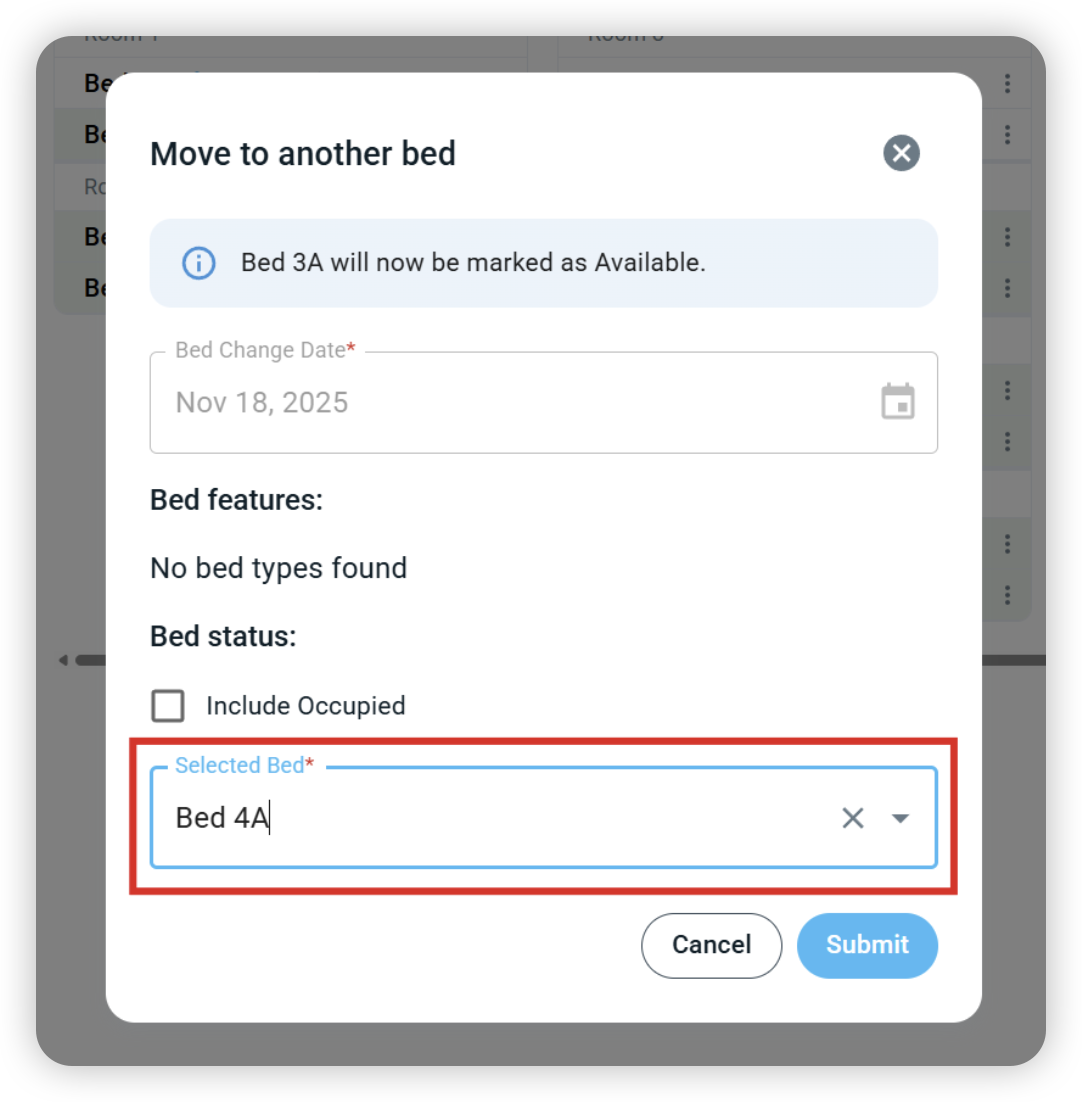
Select a different bed for the resident to move into:
The resident can now be found in their newly assigned bed.
Action 8: Swapping Two Residents’ Beds in Bed Board
Select the three dots, and select Swap beds:

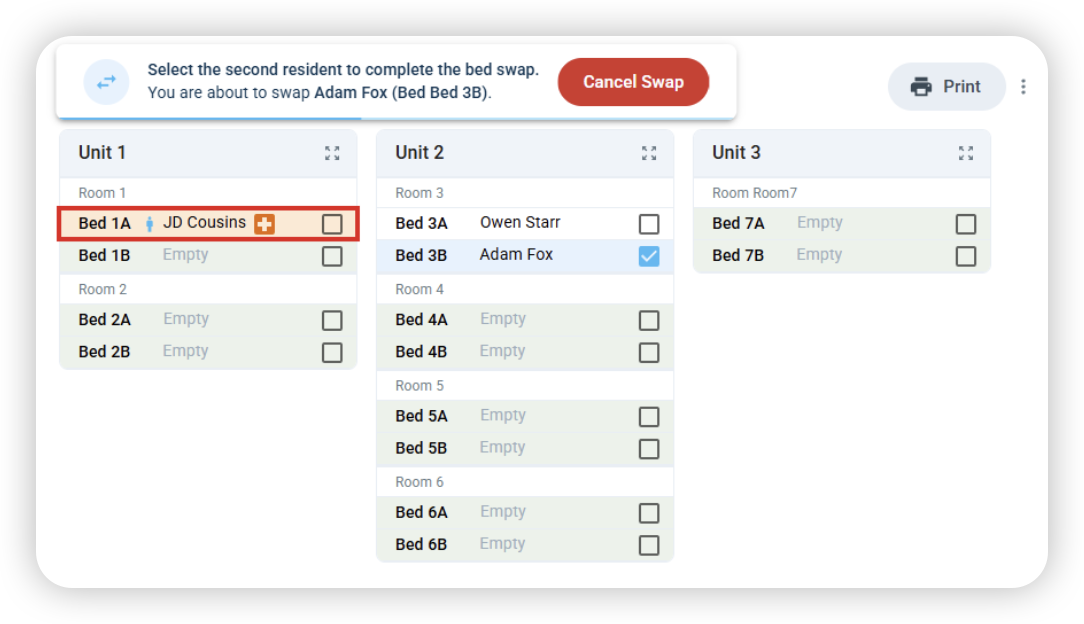
Select another resident to swap beds with:
Confirm the swap:
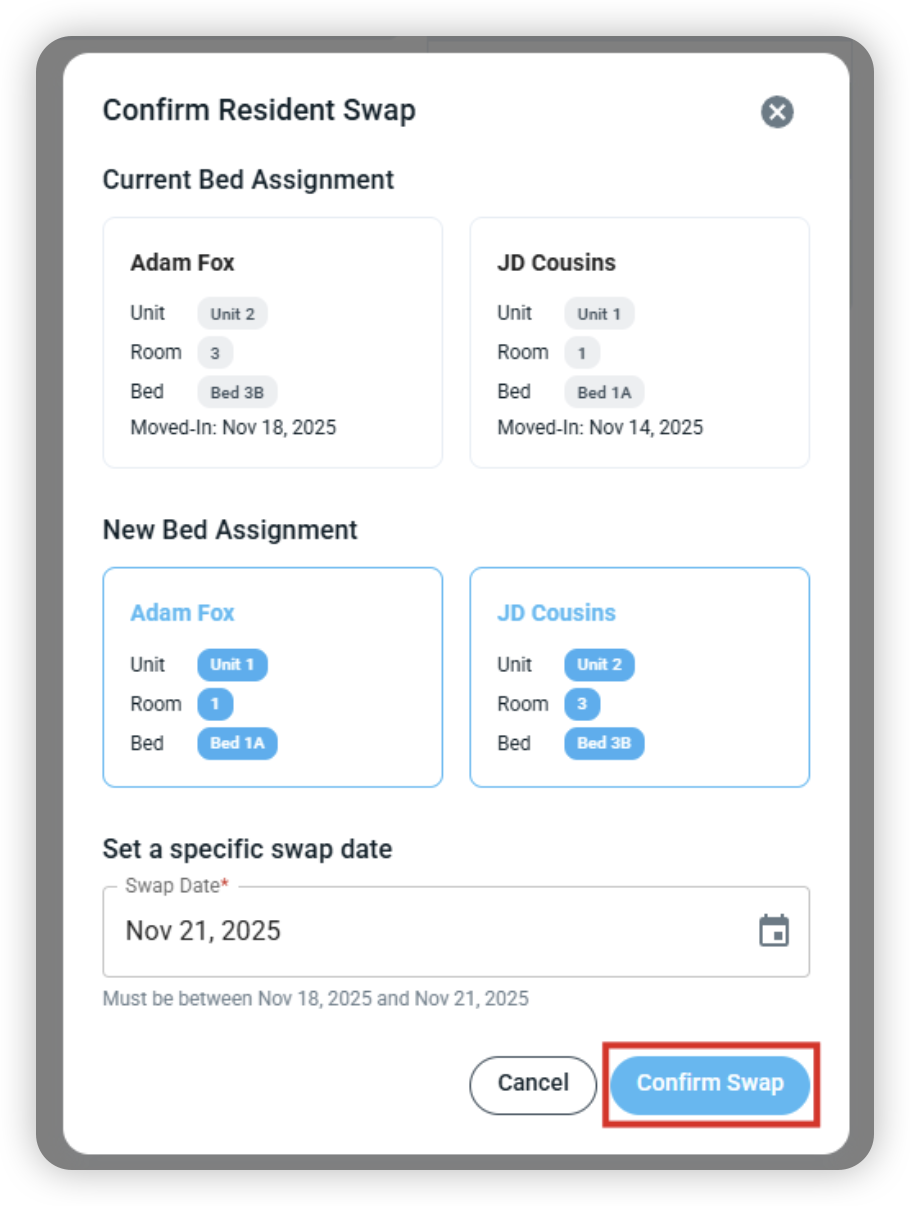
Both residents will now show up in their new bed.
Action 9: Adding a Resident Tag in Bed Board
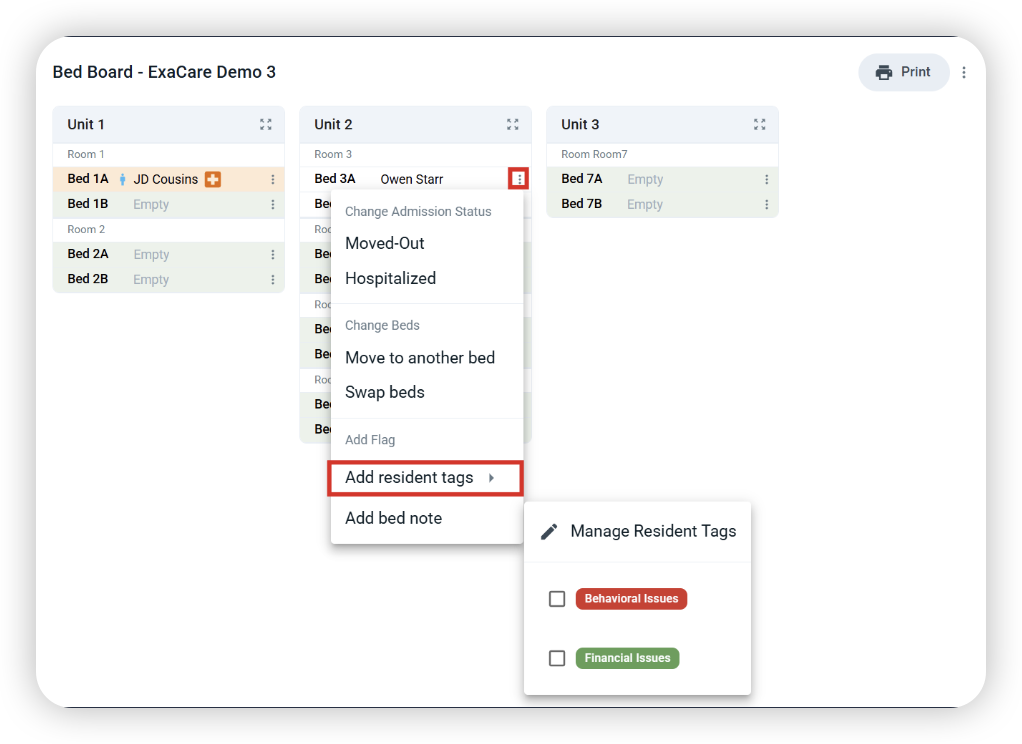
Select the three dots, and select Add resident tags, and select an existing resident tag:
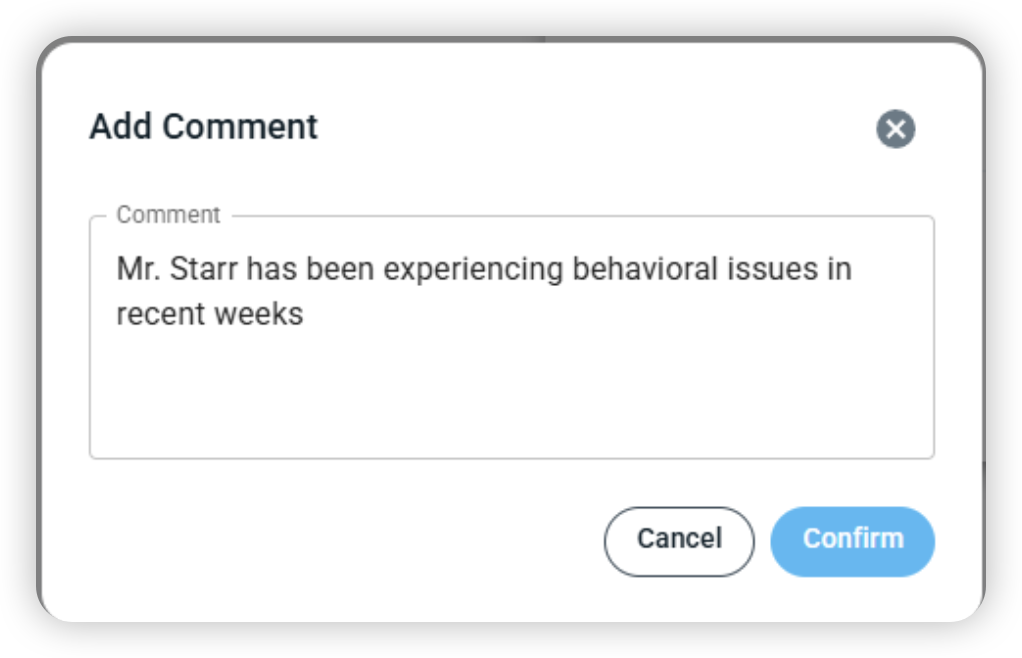
Provide further detail by commenting:
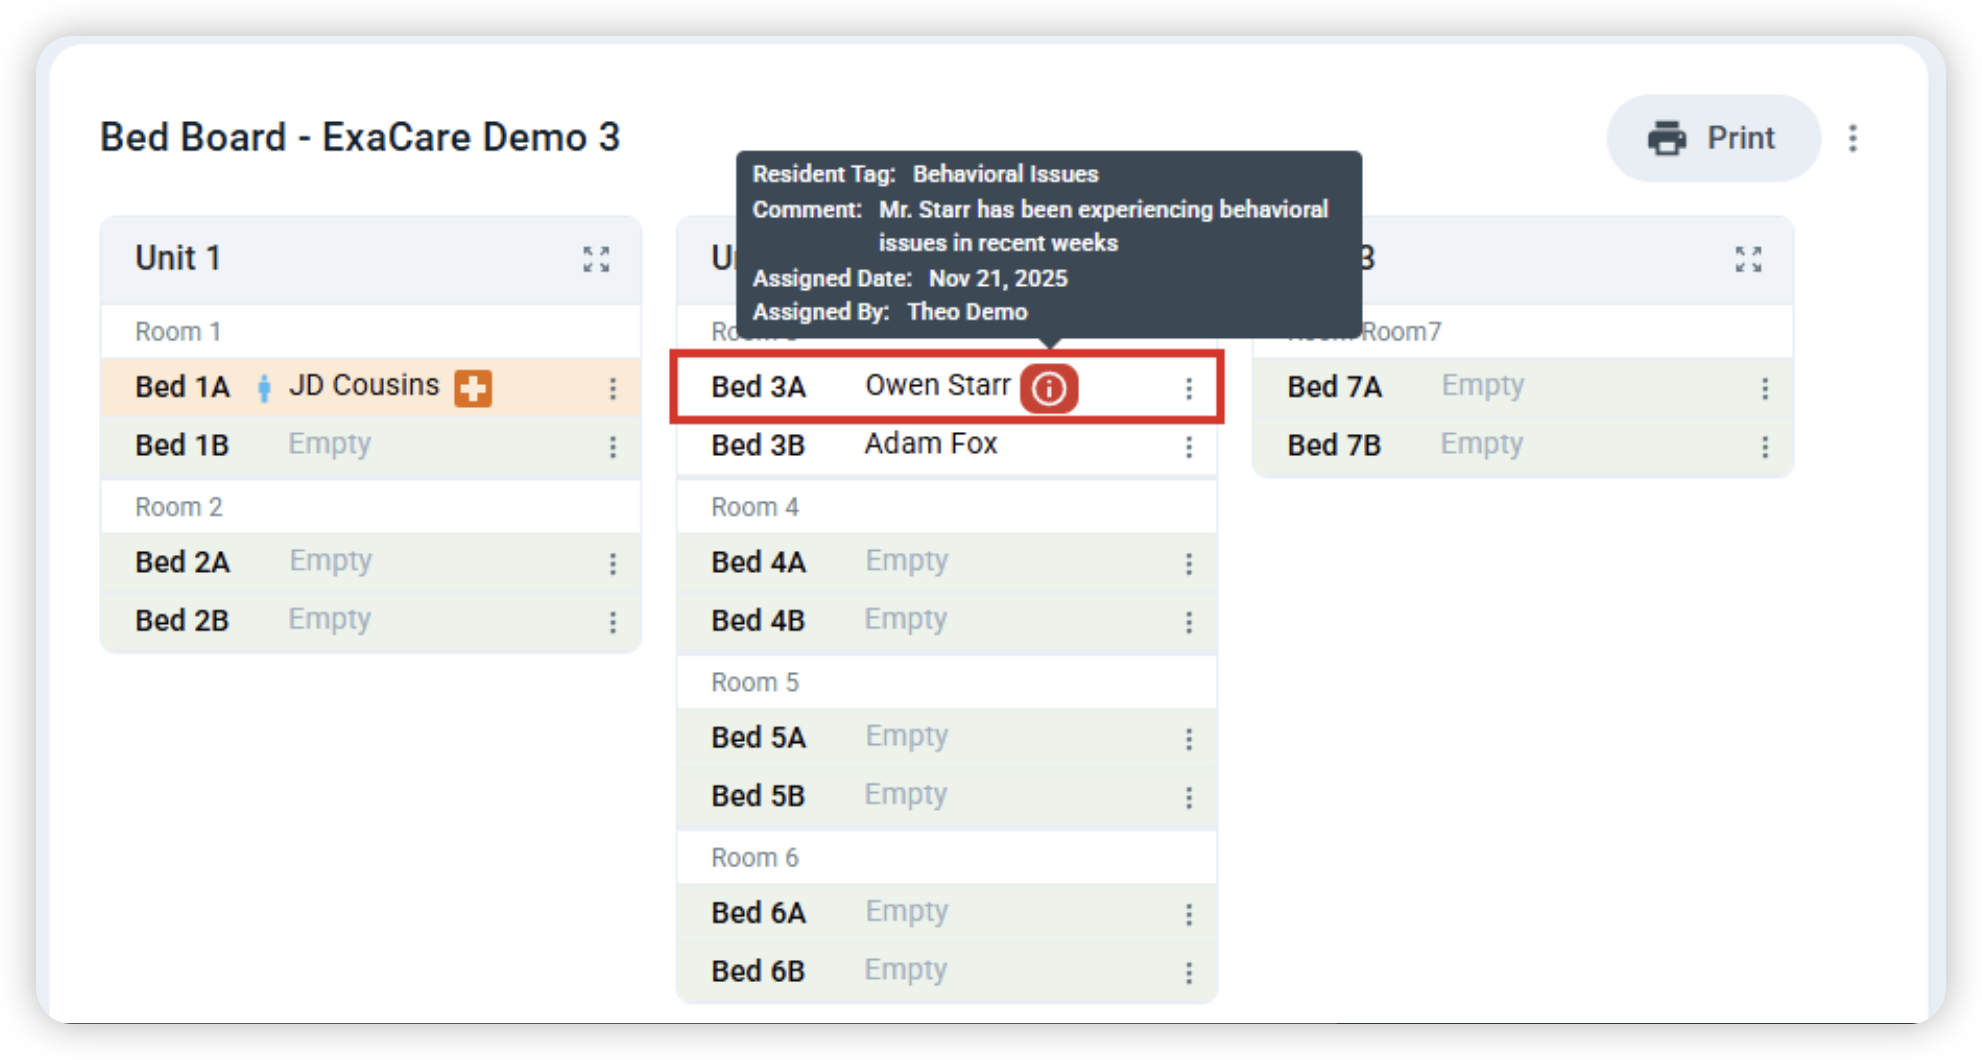
You will now see the Resident tag icon next to the resident’s name, and hovering over it will display additional details:
Action 10: Adding a Bed Note in Bed Board
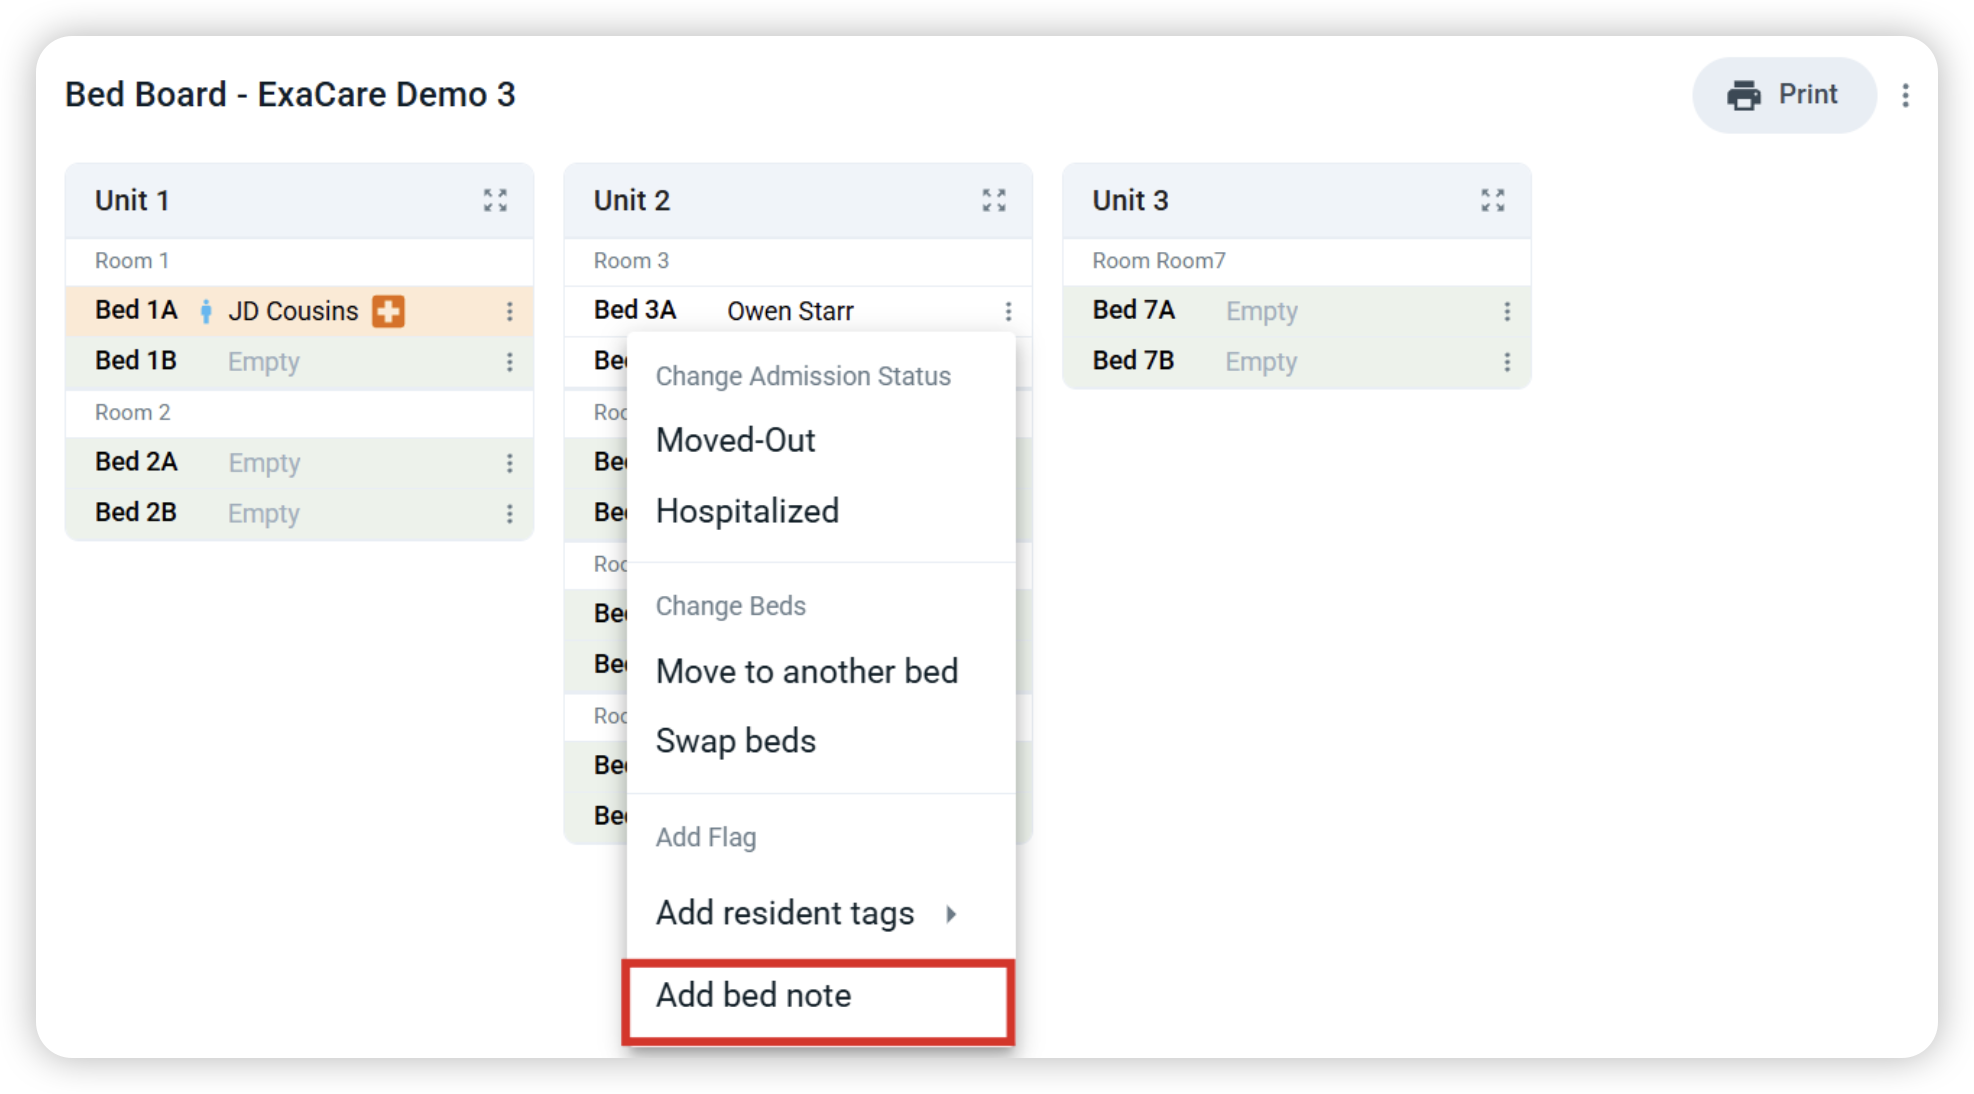
Select the three dots, and select Add bed note:
Provide further detail by commenting:
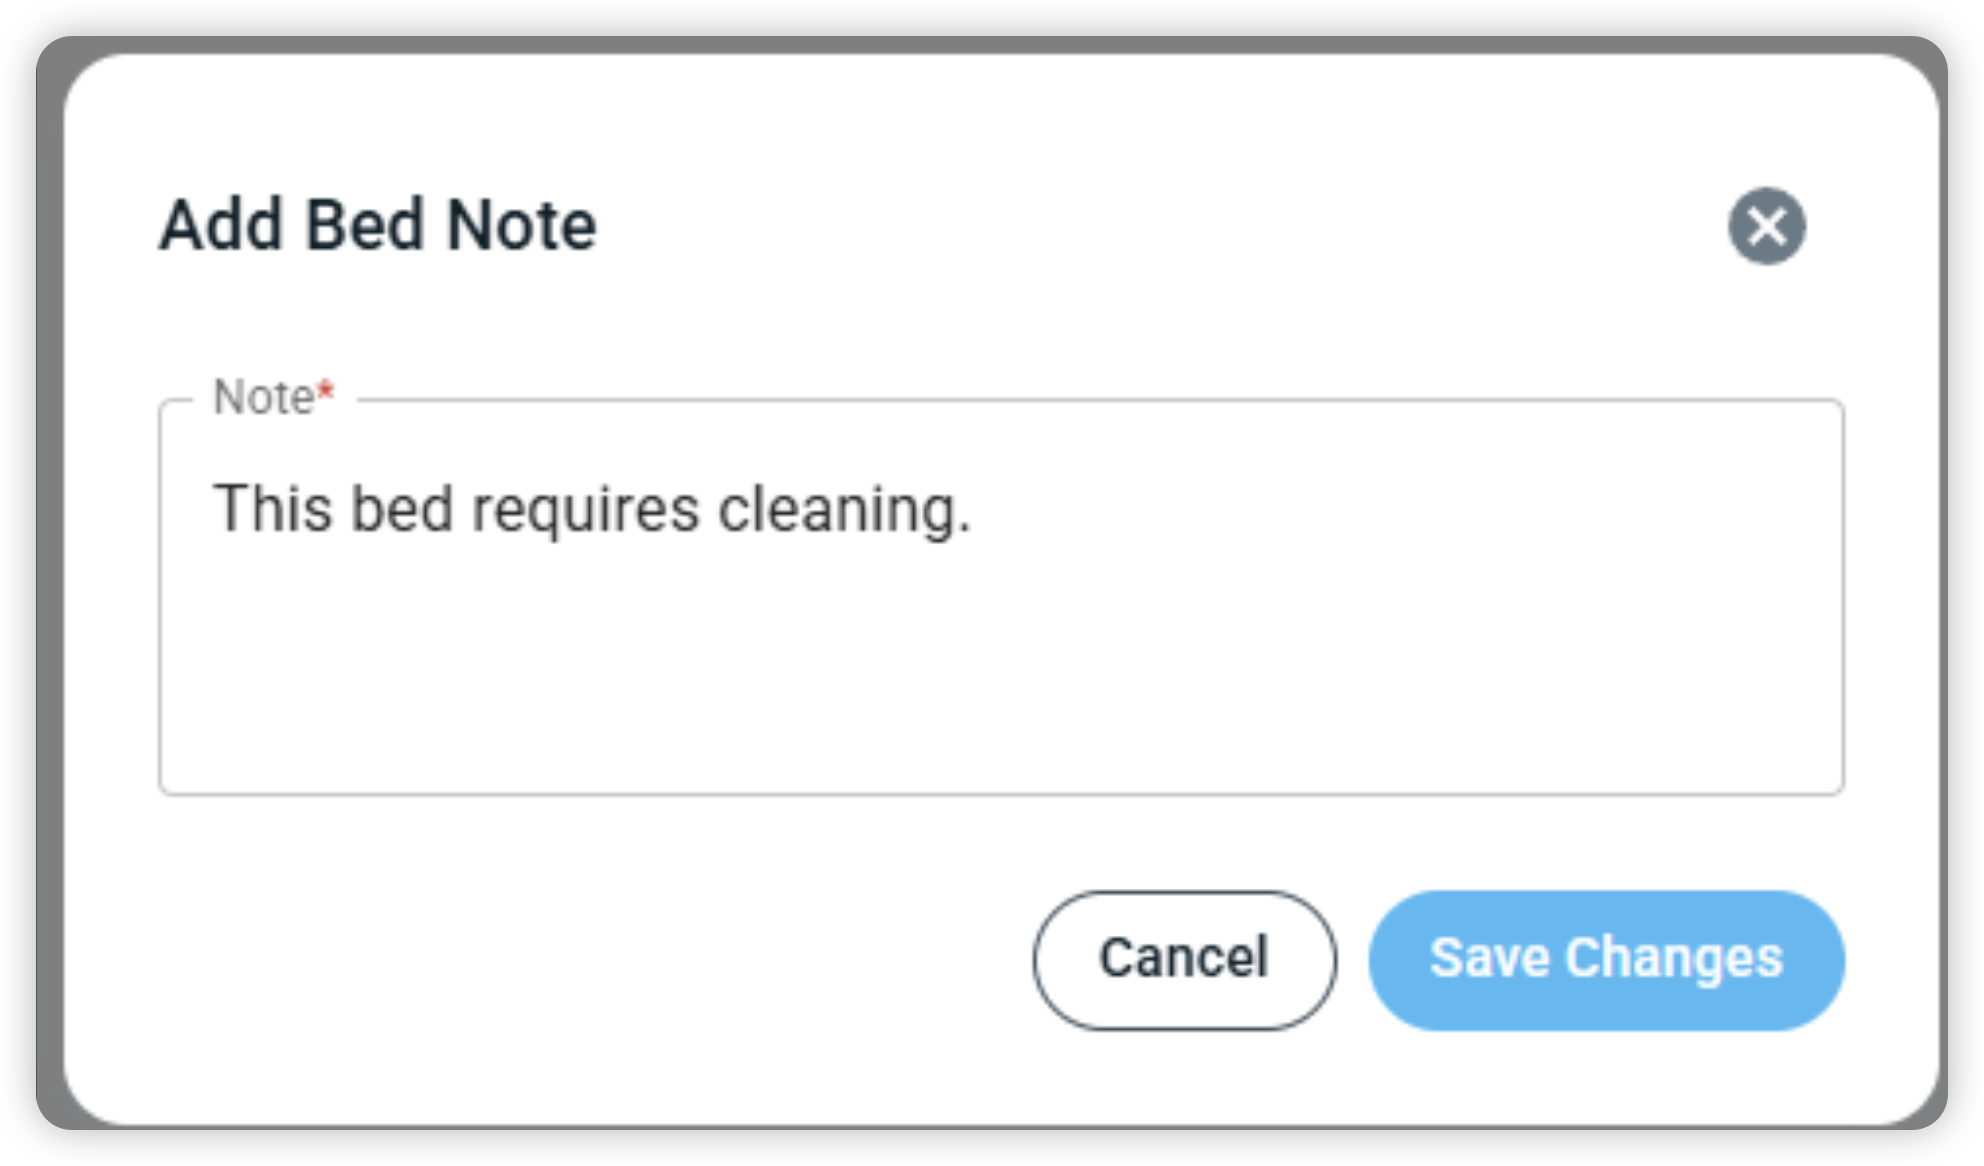
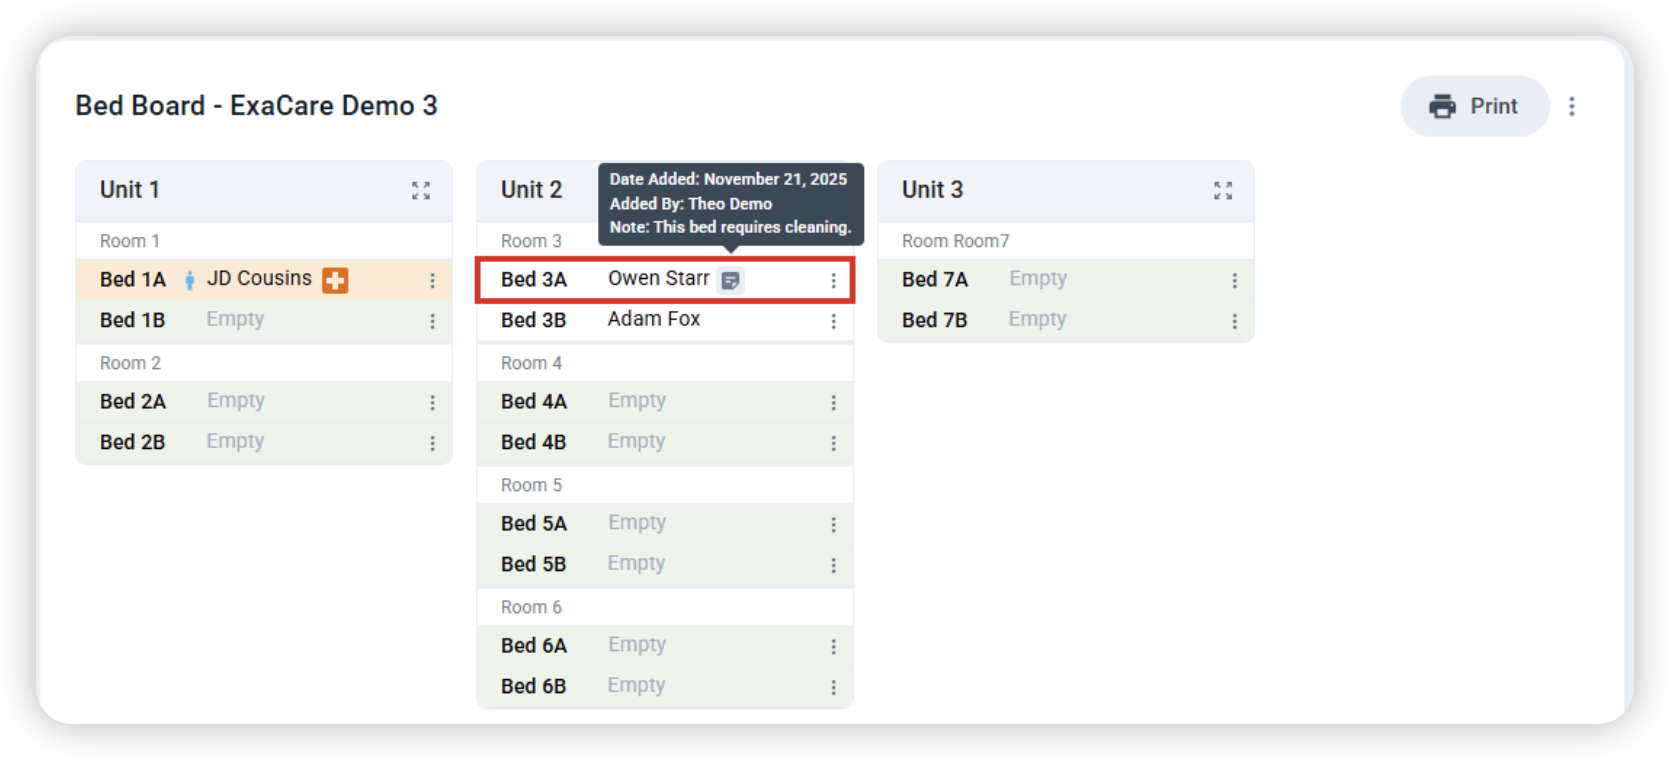
We will now see the Bed Note icon next to the resident's name and if we hover over it with our mouse, we will see further details:
Action 11: Updated Active Payer
You can now update a residents active payer directly from the residents or screener page.
Residents Page:
Navigate to the residents tab
Select the three dots on the right of a residents name
Select "Edit payer details" from the drop down

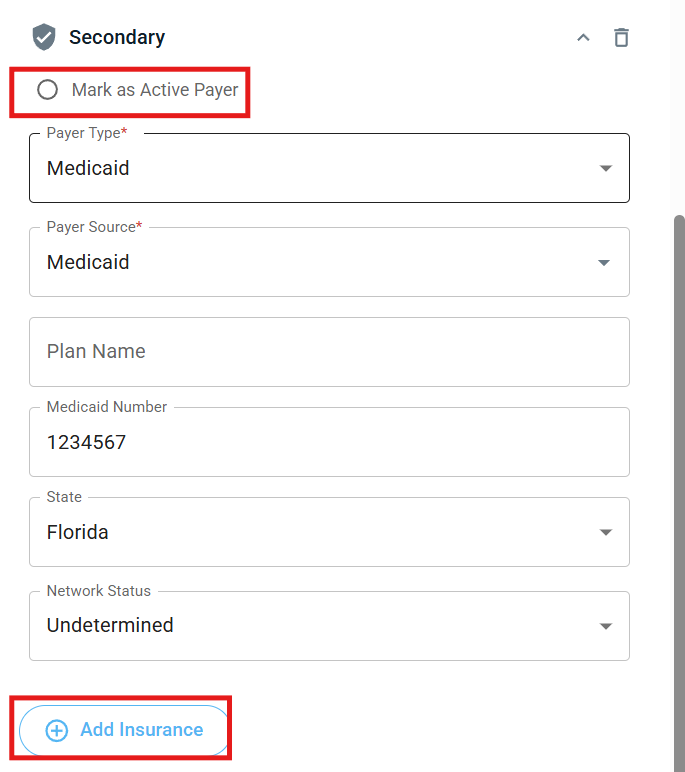
You can then edit the "Mark Active Payer Icon" or if necessary add insurance and mark the new insurance as the active payer
Screener Page:
Navigate to the screener page
Select the three dots on the right hand side of a referral
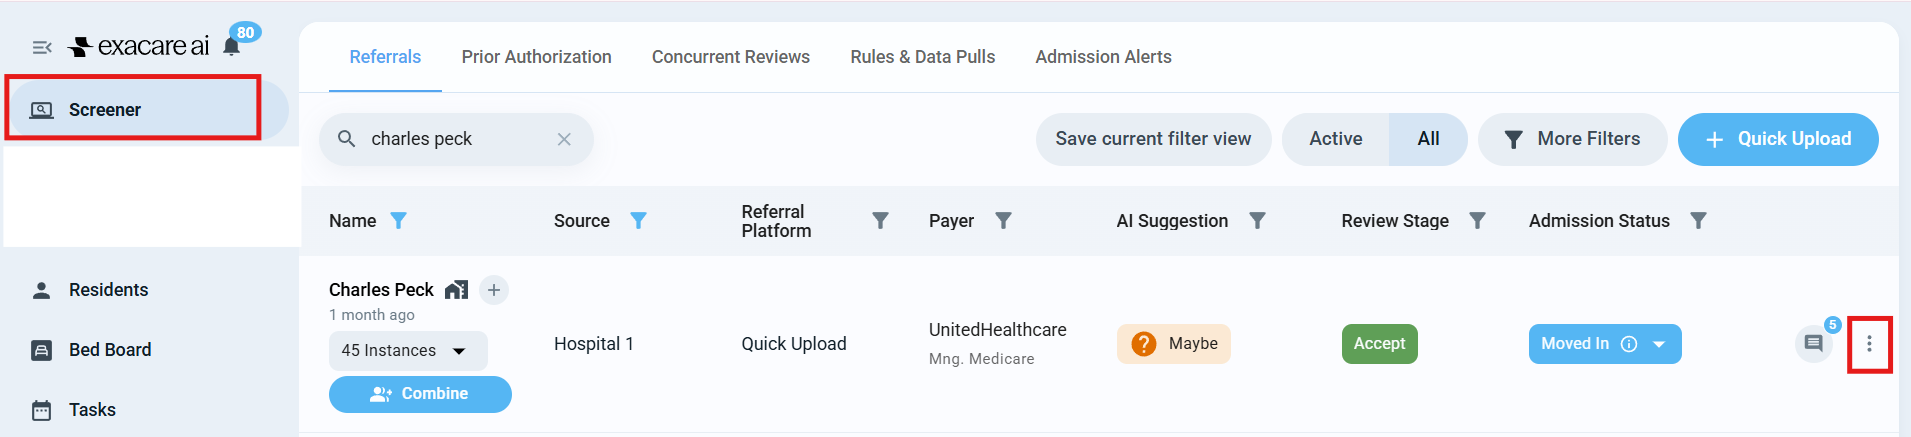
Select "Edit payer details" from the drop down
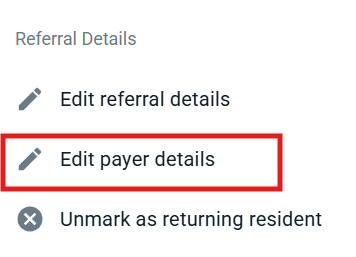
You can then edit the "Mark Active Payer Icon" or if necessary add insurance and mark the new insurance as the active payer